Become an expert, then teach your home group
In a Jigsaw, the class splits into four expert groups, one per object position. Each expert group masters the ray diagram and the image description for its one case. The class then re-forms into mixed home groups of four, with one expert per case, and each expert teaches their case while the others complete the comparison table. Because every home group needs all four experts, no case can be skipped.
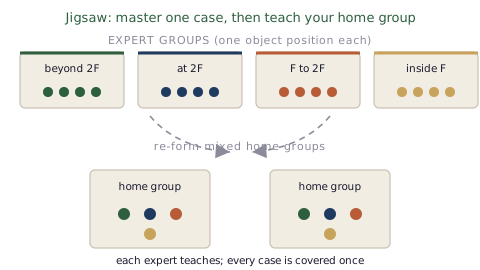
It passes the PIES test:
Every home group needs all four experts to complete the table, so no case can be skipped.
Each expert teaches their case, and a random name is called to present a diagram afterwards.
Each learner masters and teaches one case, so everyone has a turn as the expert.
All expert groups work at once, then all home groups teach at once.
Three things to prepare
- Print the four expert cards (below), a set for each expert group.
- Print the comparison table for each learner to complete in the home group.
- Plan the groupings so expert groups of four can later split into home groups with one expert from each case.
About 17 minutes, two phases
Split the class into four groups, one per object position: beyond 2F, at 2F, between F and 2F, and inside F.
Using the prepared card, draw the ray diagram and agree the full image description, until every member can teach it.
Make new groups of four with one expert from each case.
Each expert teaches their case while the others complete the comparison table. Then each learner draws one assigned case, and a random name is called to present under the visualiser.
The teacher's role during the activity
During the expert phase, check each group's diagram against its card so a wrong method is not taught on. During the home phase, listen for the full image description (type, orientation, size, where it forms) and that rays are bent once at the lens line. Vary the case you call so all four are presented.
When the room does not behave like the plan
An expert is unsure: point them back to the card; any two of the three rays locate the image, and the third checks it.
A home group runs out of time: protect the inside-F case (the magnifying glass), which is the one most often examined and most often confused.
Uneven numbers: a home group of five doubles up one case; a group of three drops the at-2F case and notes it from the table.
- Support: give the inside-F experts a pre-printed axis with the lens line and both F marks, plus sentence starters for the description.
- Challenge: ask each home group to predict how the image changes as the object moves slowly from beyond 2F toward F.
Print one set per expert group
The three rays from the top of the object are: (1) parallel then through F, (2) straight through the centre, (3) through F then parallel. Any two locate the image.
- Setup
- f = 4.0 cm, so 2F is at 8.0 cm. Place the object at 12 cm (well beyond 2F).
- Draw
- The parallel ray, bent through F on the far side; the ray straight through the centre. Mark where they cross.
- Image
- Real, inverted, diminished. Forms between F and 2F on the far side.
- Teach in one sentence
- "When the object is beyond 2F, the image is real, inverted and smaller, forming between F and 2F."
- Setup
- f = 4.0 cm. Place the object exactly at 2F, which is 8.0 cm from the lens.
- Draw
- The parallel ray, bent through F; the ray straight through the centre. Mark the crossing point.
- Image
- Real, inverted, same size. Forms at 2F on the far side.
- Teach in one sentence
- "When the object is at 2F, the image is real, inverted and the same size, forming at 2F on the other side."
- Setup
- f = 4.0 cm. Place the object at 6 cm (between F at 4 cm and 2F at 8 cm).
- Draw
- The parallel ray, bent through F; the ray straight through the centre. Mark the crossing point, now far from the lens.
- Image
- Real, inverted, enlarged. Forms beyond 2F on the far side.
- Teach in one sentence
- "When the object is between F and 2F, the image is real, inverted and larger, forming beyond 2F."
- Setup
- f = 4.0 cm. Place the object at 2 cm (inside the focal length).
- Draw
- The parallel ray, bent through F; the ray straight through the centre. The two rays diverge, so trace them back as dashed lines until they meet on the same side as the object.
- Image
- Virtual, upright, enlarged. On the same side as the object. This is the magnifying glass.
- Teach in one sentence
- "When the object is inside F, the image is virtual, upright and enlarged, on the same side: this is how a magnifying glass works."
What every home group completes
| Object position | Image type | Orientation | Size | Where it forms |
|---|---|---|---|---|
| Beyond 2F | Real | Inverted | Diminished | Between F and 2F |
| At 2F | Real | Inverted | Same size | At 2F on the far side |
| Between F and 2F | Real | Inverted | Enlarged | Beyond 2F |
| At F | None | Rays emerge parallel | Image at infinity | No image is formed |
| Inside F | Virtual | Upright | Enlarged | Same side (magnifying glass) |