The shape of the lesson
By the end of the lesson, learners can
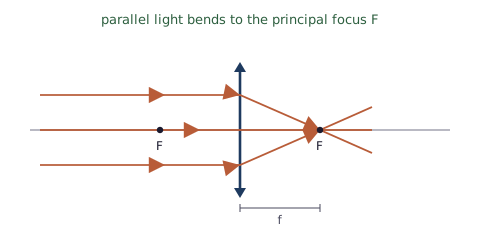
- describe how a thin converging lens bends a beam of parallel light to a single focus
- use the terms principal focus and focal length correctly, and mark them on a diagram
- construct an accurate ray diagram for the real image formed when the object is beyond the focal length
- classify any image as real or virtual, upright or inverted, and enlarged, same size or diminished
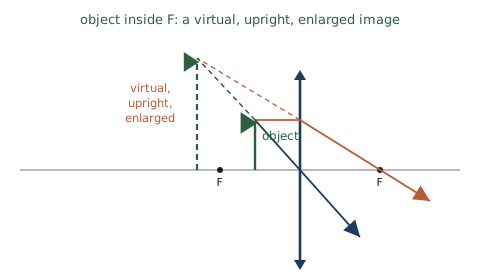
- construct a ray diagram for the virtual image formed when the object is inside the focal length
- explain how a single converging lens is used as a magnifying glass
Key vocabulary
principal axis, optical centre, principal focus (F), focal length (f), converging lens, real image, virtual image, magnification. Each term is introduced as it is first needed.
Three rays you can always draw
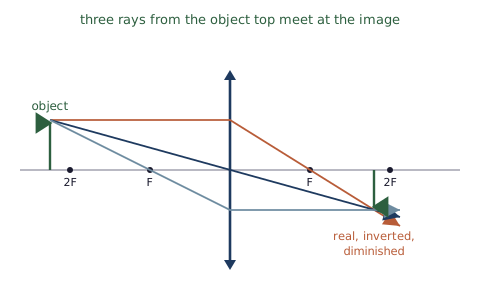
Every ray diagram in this topic is built from the same three predictable rays, drawn from the top of the object; where any two cross, the top of the image sits. In the thin-lens convention, each ray is bent once, at the vertical line through the centre of the lens. A ray parallel to the axis refracts through the principal focus on the far side; a ray through the optical centre carries straight on; a ray through the near principal focus emerges parallel. Any two locate the image, and drawing the third is a free accuracy check.
Forty-five minutes, phase by phase
| Time | Phase | What happens in the room | Grouping |
|---|---|---|---|
| 0 to 5 min | Hook: one lens, two pictures | Hold a magnifying glass close to a printed page so the text looks bigger, then move it far from a window so a small upside-down image of the window appears on a sheet of paper. Pose the question: how can one lens make a large upright picture and a small inverted one? Learners jot a private prediction, then Think, Pair, Share. | Think, Pair, Share |
| 5 to 14 min | Build the model together | Using a ray box and a converging lens, show the parallel beam closing to a focus, and mark F and f on the bench. Learners annotate a skeleton diagram (axis, lens line, F on both sides) on mini-whiteboards as the three principal rays are built up one at a time. Keep it visual before any numbers appear. | Whole class, mini-whiteboards |
| 14 to 31 min | Jigsaw of object positions | Four expert groups, one per object position (beyond 2F, at 2F, between F and 2F, inside F), each master the ray diagram and the image description for its case. Re-form mixed home groups of four so each case is represented once; each expert teaches while the others complete the comparison table. The full facilitation is in the activity materials in this bundle. | Expert then home groups of four |
| 31 to 37 min | Practical: measuring focal length | Focus the image of a distant object (a window across the room) onto a screen and measure the lens-to-screen distance. Because the object is effectively at infinity, this distance is the focal length. Connect to the Paper 5 and 6 skill of tabulating distances and spotting an anomaly. Run it hands-on or as a demonstration. | Pairs or demonstration |
| 37 to 45 min | Plenary and exit ticket | Each learner constructs one real-image diagram for a stated object position and writes the full image description, alone. Reveal a model and peer-mark against three criteria: ruler used with arrowheads, rays bent at the lens line, image nature stated in full. Exit question: in one sentence, when is the image virtual? | Individual |
One table the Jigsaw builds
| Object position | Image type | Orientation | Size | Where it forms |
|---|---|---|---|---|
| Beyond 2F | Real | Inverted | Diminished | Between F and 2F |
| At 2F | Real | Inverted | Same size | At 2F on the far side |
| Between F and 2F | Real | Inverted | Enlarged | Beyond 2F |
| At F | None | Rays emerge parallel | Image at infinity | No image is formed |
| Inside F | Virtual | Upright | Enlarged | Same side (magnifying glass) |
A Jigsaw of object positions
Split the class into four expert groups, one per object position. Each expert group masters the ray diagram and the image description for its one case using a prepared card. Re-form mixed home groups of four so that each case is represented once. In the home group, each expert teaches their case while the others complete the comparison table. Because every home group needs all four experts, no case can be skipped. A full step-by-step facilitation guide, with the four expert cards, the comparison table and a worked answer, is provided as the activity in this bundle, so it can be run faithfully.
Why it suits this lesson. The five cases share one method but differ in the result, so the topic splits cleanly into expert roles, and the home group needs every case to fill the table. The Jigsaw makes each learner responsible for teaching one case and accountable for all of them.
Where the marks are lost
| Trap learners fall into | Teaching move that pre-empts it |
|---|---|
| Bending rays twice, at both lens surfaces. | The thin-lens convention bends each ray once, at the vertical lens line. Examiners expect this. |
| No ruler, no arrows. | Freehand rays or missing direction arrows cost the accuracy mark even when the physics is right. |
| Real versus virtual confusion. | A real image can be caught on a screen and is inverted; the virtual image (object inside F) is upright and enlarged, sits on the same side, and cannot be projected. |
| Vague principal focus. | It is where rays parallel to the axis converge, not simply where the lens focuses light. |
| One focus only. | A lens has two principal foci, the same distance either side; both should be marked. |
Support, challenge and the checks
- Support: hand out a pre-printed axis with the lens line and both F marks already placed, plus sentence starters for the image description.
- Core focus: keep to real images with the object beyond F, and secure the three-ray method first.
- Challenge (Extended): the object-inside-F virtual image, justifying the magnifying-glass use, and predicting how the image changes as the object moves toward F.
Assessment. During: mini-whiteboard diagrams in the build phase, and a random call after the Jigsaw. Exit: the individual construction and full image description from the plenary. Homework: the worksheet in this bundle, four construct-and-describe questions and one practical-data interpretation.
Equipment and resources
- a ray box with single and triple slits, a converging lens (about +10 cm focal length), a screen and holder, and a metre rule
- mini whiteboards for the build phase; a pre-printed axis with the lens line and both F marks for support
- the site simulation Converging and Diverging Lenses (PhET Geometric Optics also works as a demonstration); the student topic page The converging lens